Posted by: Ernest Barteldes | September 5, 2019

Closing the Summer Season: Rockaway Beach


IMG_7857

Rockaway Beach

By Ernest Barteldes


Ever since I moved to New York I had heard about Rockaway Beach in the Queens peninsula of the same name that is at the extreme end of the city, bordering with Long Island’s Nassau County at some point. Even though I heard some great stories about it, I had never seen it because until recently the only way to get there using public transit was via a grueling hour-plus ride on the A train from Downtown Manhattan’s Fulton Street, which I never looked forward to considering that same line happens to be one of the longest and slowest in town – and not much fun in the first place. After all, Staten Island has its own beaches, and we have been frequent visitors to Fire Island in the last few years.

IMG_7846

Verrazzano-Narrows Bridge from NYC Ferry

We would probably have stayed away if the City of New York hadn’t come up with a new affordable ferry service to various locations around town (including some that have always been a pain to get to via subway or bus), including a connection to Rockaway. The ferries, which are subsidized by the City of New York, cost as much as a subway ride each way but are a much better ride than the MTA can offer.

Taking all that in consideration, Renata and I decided to give it a try. We took the Staten Island Ferry to Manhattan and walked a few minutes towards Pier 11 on Wall Street, where many commuter lines (including a few to New Jersey) depart from. We purchased the tickets beforehand using the service’s mobile app and it was seamless. We rode on the top of the boat and enjoyed the striking views along the way, riding under the Verrazzano-Narrows Bridge and catching glimpses of Coney Island, Sheephead’s Bay and finally Rockaway itself.

As we left the ferry, we boarded shuttle buses that dropped us off at the beach proper, and we found our spot. The beach was very clean, and the sand was spacious enough that we were able to have a comfortable distance from other beachgoers, and we enjoyed the sun and the cool breeze coming from the ocean.

IMG_7851

Clock at The Boardwalk, Rockaway Beach 

We brought a cooler with our own supplies, so it wasn’t necessary to stop at one of the local bars on the boardwalk (which was really made of concrete). At the end of our stay, we headed to the bus stop and waited about fifteen minutes for the shuttle bus that took us back to the pier to meet the ferry, which was already there when we arrived.

I was pretty impressed by the service, which allowed us to finally get to know Rockaway Beach – the stay there was very pleasant, and it was a great way to end the “unofficial” summer season for 2019.


Posted by: Ernest Barteldes | August 29, 2019

Summer Cooking, Continued: Andalusian Salad


20170630_003020-1

A tapas joint in Southern Spain

By Ernest Barteldes


I always pair salads with dinner, but there are some salads that can stand alone as a whole meal, and these are some of the go-to meals I like to make during summer because they are mostly easy to make and are also substantial and filling.

One of such is a recent discovery that I found out about when looking for a salad recipe to go with a Spanish recipe I was trying. It is a recipe from Andalusia, the Spanish region my wife and I spent some time in during late September 2018 and whose culinary we completely fell in love with.

The salad is quite easy to make, since it only takes a few ingredients: boiled potatoes and eggs, fresh tomatoes, onions, canned tuna, black olives and of course a generous pour of olive oil. At home, we have that with a side of garlic bread and pretty much nothing else. One of its great advantages is that it can be kept in the refrigerator for a few days without losing any of its flavor – actually it tastes better the next day since the flavors develop even further, resulting in a great Mediterranean experience.

img_ensalada_de_verano_andaluza_58493_600

Andalusian Potato Salad

Source: Recetas Gratis

Ingredients:

2 cans of tuna in oil, drained

3 medium potatoes

15 pitted black olives

2 medium tomatoes

1 small onion

3 eggs

Olive oil and salt to taste


Preparation

Boil the potatoes with their skins in salted water until tender. In the meantime, boil the eggs in a separate pot. When cool enough to handle, peel the potatoes and the eggs, slice them and place in a salad bowl. Slice the tomatoes, olives and onions and place on the potato and egg mixture. Add the tuna and  mix all ingredients, adding salt and olive oil, mixing until all blended. Serve with crusty bread or toasted garlic bread.


Posted by: Ernest Barteldes | August 15, 2019

Summer Cooking, Continued: Seafood


42724808_10155841335778733_5981187300543954944_n

Tapas at Cafeteria La Flor, Malaga/Ernest Barteldes

By Ernest Barteldes


Seafood is one of the most common foods that we eat at home in summer for various reasons, but the first is the fact that fish and shellfish require minimal cooking – most kinds (except maybe for salmon) are thoroughly cooked in minutes and once the other ingredients are ready, on the plate in no time.

Although moqueca is my personal favorite seafood dish in the planet, I always try to change things up for Sunday dinner because the dishes I make for our weekday lunches are pretty repetitive because it is easier to plan things this way instead of having to work out what to make every week. Of course, I change ingredients up frequently, but the base is almost always the same save for meat-free Fridays (no, I don’t do that on Monday because we usually have leftovers from Sunday on that day, and it’s not always vegetarian.

For these quickly made dishes I often turn to Mark Bittman’s Quick and Easy Recipes from The New York Times (Broadway Books, 2007)  a cookbook I purchased at long-gone Borders Bookstore during their liquidation sale ( I got countless other books during that time, including a Harry Potter collection I gifted to Renata). It is a book with lots of minimalist recipes that are simple but also tasty – the recipes feature easy to find ingredients but they come with great results.

A recent weekend, inspired by our recent visit to Malaga, I prepared Spanish-style shrimp, which is simply fried in olive oil with a mixture of paprika, garlic, parsley and cumin. The shrimp is cooked unpeeled to preserve its juices and flavors. “The shells contain as much flavor as the meat,” writes Bittman in the introduction, “and you want that flavor in the sauce.”

The end result was shrimp very similar to what I encountered in our favorite tapas bars in Malaga – the paprika adds flavor and color, and the sauce goes great with a side of yellow rice.

20140307-spanish-garlic-shrimp-gambas-al-ajillo-recipe-12

Shrimp in Garlic Sauce

Spanish-Style Shrimp

Source: Mark Bittman’s Quick and Easy Recipes

Ingredients:

1/3 cup extra virgin olive oil

3 garlic cloves, cut into slivers

1 tsp. ground cumin

1 tsp. paprika

2 pounds unpeeled shrimp

Salt and freshly ground black pepper

¼ cup fresh parsley


1 Combine the oil and garlic in a 10 to 12 inch skillet. Turn the heat to medium and cook until the garlic begins to sizzle, and add the cumin and paprika. Stir, raise the heat to medium-high, and add the shrimp, along with some salt and pepper.

Cook, stirring occasionally, until the shrimp are all pink, no longer, you do not want to evaporate their liquid. Turn off the heat, add the parsley and serve.

Posted by: Ernest Barteldes | August 7, 2019

A Visit to Cherry Grove, Fire Island


By Ernest Barteldes

IMG_7750

Cherry Grove Beach/Ernest Barteldes


Ever since we discovered Fire Island, not a summer goes by without at least one visit, even if it’s just for the one-day trips offered by the Long Island Rail road during the period between Memorial and Labor Day. Admittedly, it makes for a very long day (especially for us, who come all the way from Staten Island), but it’s worth every minute because you will not find a cleaner or nicer beach in New York.

As we have done in previous trips, we chose the community of Cherry Grove for our latest visit, which took place in early August. We like going there because it is more laid-back than other parts of the island and also because it is one of the few villages with ferries running every hour during summer (The Kismet Ferry, for instance, runs every 90 minutes or so).

IMG_7742

The Ferry

The day before, I prepared some ham pate and a noodle salad and also stocked up on wine, water and juice. We woke up early the next day and headed to Penn Station, where we took the train to Sayville on Long Island. The train was emptier than usual, but I guess that happened because we chose to go on a Sunday because the weather forecast had not been promising for Saturday. We reached the ferry station about 25 minutes before the scheduled ferry, so we stopped by the local bar for a cold beer before we got on. On the way there we met a dear friend (the same we had gone on the previous weekend’s wine trip), who brought along a co-worker to join us at the beach.

IMG_7755

The Pier on Fire Island

We reached Cherry Grove at around noon and headed straight to the beach, where we set up a few yards from the water. The beach was not very crowded, and had the usual mix of clothed, nude and topless sunbathers. The day was incredibly hot, but there was a nice breeze to cool us off as we enjoyed the sand. The water, by contrast, was very cold but I still took a few dips – it was too good to resist. In between conversations, I picked up my trusty ukulele and played a few songs, which got the attention of a nearby sunbather who complimented me for my playing.

After about three hours or so in the sun, we headed back to the village, where we stopped for a drink at Top of The Bay, a nice little bistro on the top floor of a house close to the ferry. We chose that one for one simple reason: it was the sole air-conditioned bar in the area (Cherry’s and others are pretty much in open space), and we needed a break from the heat. We enjoyed a couple of cocktails (they had a 2-for-one happy hour deal) as we waited for the boat that would take us back to Long Island.

In spite of the intense heat it was a very enjoyable day – I hope we can head there again before the end of the “unofficial” summer season on Labor Day.


Posted by: Ernest Barteldes | July 31, 2019

A Day Trip to the Hudson Valley Wine Country


IMG_7704

Benmarl Winery/Ernest Barteldes

By Ernest Barteldes


On the last weekend of July, Renata and I joined a dear friend for a trip to the Hudson Valley wine country promoted by New York Wine Events, a company that organizes trips to both that area and also to Long Island. We had gone to similar events promoted by New York’s Metropolitan Transport Authority a few years back, but this was a different experience than those we had before.

We started the day by meeting our bus in Midtown Manhattan not far from Grand Central Station, and we departed for the first winery at around 9:00 AM. The trip took roughly two hours, and as we arrived on the grounds of Benmarl Winery in New Paltz, NY, which is advertised as having the oldest vineyards  oldest in the area. We were seated in a large room and the tastings began, paired with freshly made pizza (plain cheese, broccoli and fresh mushrooms).  All the white servings were very good, but our favorite was a stainless steel chardonnay, which had a very crisp fruit flavor thanks to the lack of oak – something that often overpowers this kind of wine. We were served two reds, but I personally wasn’t very impressed – they lacked the robust personality of the Italian or Spanish reds I usually purchase at my local wine stores, but many in the room seemed to enjoy them a lot.

IMG_5157

Stainless Steel Chardonnay/Ernest Barteldes

We spent some time in the winery’s grounds, so we purchased a chilled bottle of the chardonnay ($ 14) and enjoyed it as we waited for the time to depart to the next winery. We boarded the bus and rode for about 30 minutes and reached Robirero Family Winery (also in New Paltz).  The venue seemed to be a popular location there, since there were families sitting at the tables outside with snacks or containers with food probably brought from home, which were displayed on the table along with bottles of wine.

IMG_7722

Inside The Tasting Room/Ernest Barteldes

We were served four varieties, including very good white and rose blends. They paired the wines with cold sandwiches. They were very tasty and catered to different tastes – one was made with chicken and vegetables, and another was a black bean and avocado concoction (there was a third flavor, but I cannot recall what it was).  The red was also very good, but we preferred the other varieties – probably because this being a very hot day it really called for chilled wines. We were given about two hours to tour the grounds, so we walked around for a while then bought another bottle of wine. I walked over and introduced myself to the musician, and sat in and performed The Beatles’ “Something.”

IMG_7728

Wallkill View Farm Market/Ernest Barteldes

Our last stop was at Wallkill View Farm Market, where folks in our group purchased some fruit, vegetables and cheese (from what I could gather). After about 15 minutes we headed back to Manhattan, where we were dropped off at the point where we began.

The main difference between this trip and the previous ones we took with the MTA was that food was included with the tastings, and also the pours were considerably more generous. On the former, we also stopped in a nearby town for lunch (which we had to pay for). The duration of the trip is pretty much the same, but the latter is far more relaxed.

Posted by: Ernest Barteldes | July 18, 2019

“Petiscos,” the Brazilian Version of Tapas


359466_61f32c81fb4145fe8660b82a56325911mv2

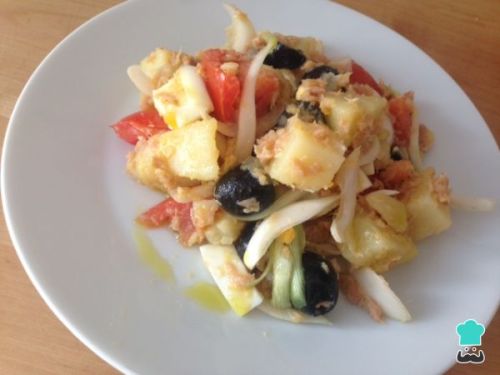
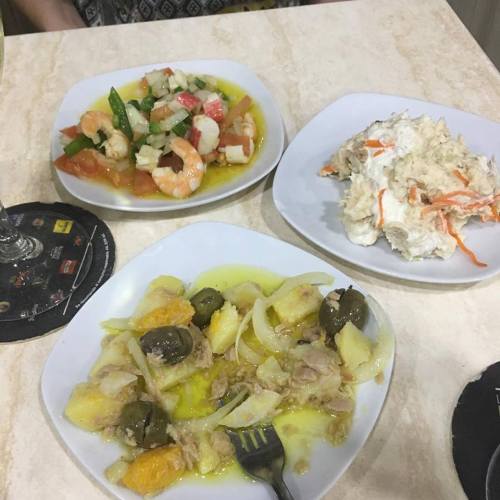
A table of Brazilian Petiscos

By Ernest Barteldes


I recently wrote two short articles on how enamored I am of the tapas culture of Spain, but to be true that nation does not hold a monopoly on small plates. Years ago I visited a restaurant in Little Italy (which has since closed) that also specialized in that, and there are several restaurants around this country that specialize on this kind of meal (yes, order enough of them and you’ll be full), and other cultures around the world have their own version of what is mostly recognized as “tapas.”

In Brazil, thanks to the strong influence of Portugal in its cuisine, small plates are also popular under the name “petiscos,” which is pretty much untranslatable since they are not necessarily “snacks,” as the dictionary would have it. Petiscos are small dishes that are commonly served to accompany drinks – alcoholic or not – and are usually leisurely enjoyed between meals at bars or even at home. They can go from simple chunks of cheese cut in squares with olive oil or grilled Calabrese sausage served with a side of farofa (spiced yucca flour) on to more elaborate treats like the Lebanese-inspired kibe (kibbeh).

rollmops

Rollmops, common in Southern Brazil

Petiscos can vary a lot in Brazil depending on the region. For instance, in Curitiba they have one that is basically herring fillets served with pickles and onions – a clear influence of the large Polish-Brazilian community in the area, while in Sao Paulo boiled quail eggs in a ketchup dressing might be more common northeast you’ll find them made with more local ingredients  – the Calabrese sausage gives way to frescal sausage cooked in a pit or fried yucca might be more prevalent than French fries since cassava is more available there than in other areas of the country due to the local climate.

As said before, petiscos are not part of a meal, but I have seen many Brazilians live on them during the weekend in lieu of dinner when out with friends at the bar. Non-drinkers enjoy them too as they are part of the local culture – you have to eat a bit when hanging out with friends, and since eating a big dinner is not exactly popular in most of the country (except if it’s a special occasion), you will easily find revelers enjoying them through the night with rounds of beer or caipirinha.
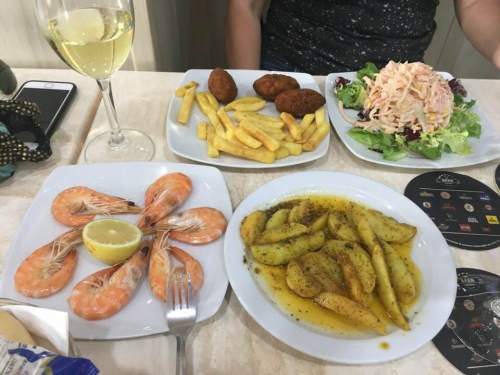
macaxeira-frita-sequinha

Fried Yucca

Fried Yucca (cassava)

(my recipe)

Ingredients: About 1-2 lb. of raw yucca (Goya has a frozen brand that does not need to be boiled, but I prefer using the fresh stuff)

Oil for frying

Salt to taste


Instructions:


Boil water in a large pan (a Dutch oven if you have one), and cut the fresh yucca (skip this if using frozen) to fit the pan. Boil the yucca in medium heat for about 20 minutes until the root is cooked but firm (cooking until soft will make frying impossible). Drain and let cool. Peel the yucca and quarter it, forming thick fry-like pieces.

Heat oil in a deep frying pan and fry the yucca until golden. Put on a plate with paper towels to soak up the oil. Serve hot with salt to taste.

16_52_57_898_download_3_

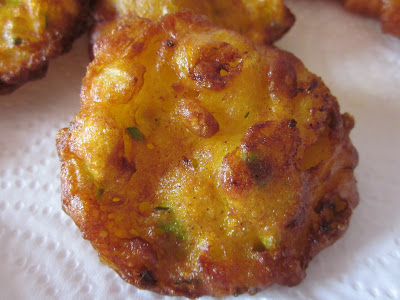
Kibe (meat croquettes)

 (source: The Spruce Eats)

These are a little labor-intensive but delicious. They can also be made with ground turkey or chicken if preferred.

Ingredients

1 cup bulgur wheat

1 1/2 cups beef broth (or water)

2 tablespoons olive oil 1 large onion (finely chopped, divided)

2 cloves garlic (minced)

1/2 teaspoon cinnamon

1/4 teaspoon nutmeg

2 pounds ground beef

1/3 cup parsley (chopped)

1/2 teaspoon salt (or to taste)

1/4 teaspoon black pepper (or to taste)

1/2 cup mint leaves (packed)

1 quart vegetable oil (for frying; or more as needed)

Garnish: lime wedges or tahini sauce


Instructions


Gather the ingredients. Place the bulgur wheat in a heatproof bowl.  In a small pot, bring the beef broth or water to a boil. 04 Remove from heat and pour over the bulgur wheat. Let the wheat rest for 1/2 hour.  Make the filling by placing 2 tablespoons olive oil in a skillet, and sauté half of the chopped onions, all of the minced garlic, all of the cinnamon, and all of the nutmeg.  When onions are fragrant and soft, add 1/3 of the ground beef. Cook, stirring until the ground beef is well-browned. Stir in the parsley and cook 1 to 2 minutes more. Season with salt and pepper to taste. Set aside.  Drain the bulgur wheat in a colander, pressing down on the wheat with the flat side of a spoon to press out all of the excess liquid.  Place the bulgur wheat in the bowl of a food processor with the remaining (uncooked) ground beef, remaining raw onions, and mint leaves. Add 3/4 teaspoon salt and sprinkle generously with freshly ground black pepper.  Process ground beef mixture until the mixture is very smooth, like a dough.  If you have time to chill both the uncooked beef mixture and cooked filling for several hours, it will be easier to shape the kibe. Take golf ball-size balls of the uncooked beef mixture and press them flat into the palm of your hand. Place 1 tablespoon of the cooked beef mixture in the middle. Then close the “dough” around the filling and seal well. Shape the balls into elongated football-like ovals, with pointed ends. Place kibe on a baking sheet until ready to fry. 17 Heat several inches of oil in a deep pot to 350 F. Gently lower the kibe into the oil, working in batches, and cook until very dark brown and crispy. 19 Drain the kibe on paper towels. Serve kibe warm with lime wedges and tahini sauce for dipping

Posted by: Ernest Barteldes | June 27, 2019

Cooking in Summer: Stay Away From The Oven!


tc_summer_comedy_camp

Source: Second City 

By Ernest Barteldes


I’m not one to mind the heat much during the summer months, but there are days when it’s unbearable to do so: the other day, I was making Hawaiian sweet and sour ham on what turned out to be a very sticky day, and just the heat from the skillet and the boiling rice next to it combined with the general feel was so overwhelming that I started feeling a bit nauseated, so I needed about three glasses of water and a long rest before I could do anything else.

During the summer, I avoid the oven like the plague – I only use it if I absolutely have to, so most of what I prepare during summer is either grilled, pan-seared or even raw. Also, there are some main courses that taste great served cold, even if at first they might sound strange.

One recipe I love to make came from a collectible box I used to have called Grandma’s Kitchen. For years I kept two of those boxes, which kept recipes that came in the mail every week or so. Those boxes are unfortunately long gone but the recipes I used frequently are burnished in my memory forever. It is a simple vegetarian spaghetti that is actually served cold – you simply prepare the sauce with fresh tomatoes, basil and garlic that is blended together in a food processor or blender and refrigerated while the pasta cooks. Once done, simply add the sauce then added to freshly boiled al dente spaghetti.

As accompaniment a simple green salad would do.

674698

Cold Spaghetti

Source: Grandma’s Kitchen

Ingredients:

  • 4 ripe tomatoes – peeled and seeded
  • 3 cloves garlic, peeled
  • 1/3 cup chopped fresh basil
  • 1 teaspoon olive oil
  • 1/2 teaspoon white sugar
  • 1 (8 ounce) package uncooked spaghetti
  • 1/2 cup shredded Parmesan cheese


Instructions:


In a blender or food processor, combine tomatoes, garlic, basil, oil and sugar and process until smooth. Cover and refrigerate sauce. Bring a large pot of lightly salted water to a boil. Add pasta and cook for 8 to 10 minutes or until al dente; drain. Remove sauce from refrigerator and pour over spaghetti. Toss to coat and serve topped with Parmesan cheese.


By Ernest Barteldes

IMG_7428

A Transport Wagon used by Nazi Germany (Ernest Barteldes_

Outside the Jewish Heritage Museum in New York City a brown freight train wagon from the 1930s stands as part of the exhibition Auschwitz: Not Long Ago, Not Far Away. The wagon is one of many that was used by Nazi Germany to transport prisoners – mostly Jews deported from countries throughout Central and Western Europe that were either occupied by or allied to Hitler’s Germany.

As you enter the museum’s halls, you see a barbed-wire fence that once stood in Auschwitz – a stark reminder of the horrible conditions the prisoners faced. As you follow the exhibit, you go through many floors that follow history starting from the defeat of Germany in World War I, the establishment of an independent Poland in 1918 and the terms of the Treaty of Versailles, which heavily punished Germany for starting the war and generated heavy resentment among its people along with a crippling economic crisis augmented by the 1929 stock market crash.

These and other factors  ultimately led to the rise of the Nazis, who came to power using rhetoric that blamed the elites – especially the Jews – for the country’s situation while also making impossible promises of prosperity to the German people.

We then go along the exhibition as Hitler rises to power and begins systematically stripping Jews from their rights until they are pushed into ghettos. As the war begins with the invasion of Poland in September of 1939, things progress quickly and the extermination camps – which would attempt to carry through the Final Solution – were established.

IMG_7430

Barbed Wire Fence (Ernest Barteldes)

The exhibit also reminds that it was not only about Jews but also all races that the German government thought inferior, including Poles, Bolsheviks (Russians), homosexuals and the Roma – many of whom were also murdered at the extermination camps, and they also mention the massacre of Poland’s intellectuals, POWs officers and leaders in Katyń by the Soviets under Josef Stalin’s orders, which was memorialized by Polish director Andrzej Wajda in his 2007 movie Katyń.

Incidentally, Katyń  became even more poignant for Poles in 2010 when a the presidential plane that was  carrying various dignitaries – including President Lech Kaczyński – crashed near the Russian city of Smolensk, where there would be a ceremony commemorating the massacre, killing all on board.

As the history progresses, eyewitness accounts on video (which can be heard on a portable device handed out at the beginning of the exhibit) detail the atrocities committed in Auschwitz/Birkenau, including the experiments carried out by Josef Mengele and the mass gassings and cremations that took place there.  There are many artifacts, including suitcases that the prisoners were forced to leave behind, shoes and prisoner uniforms, among other things.

As you exit the exhibit, you see the image of a smiling elderly woman, a lucky survivor that went through all those horrors and lived to tell the tale. On the color video loop, she seems to be preparing food – a luxury that she certainly didn’t have when her life was seen as worthless by her cruel, heartless captors.

IMG_7435

A Prisoner Uniform

This exhibition is important for many reasons – one of them is the fact that many people are forgetting about the Holocaust – in fact, according to a recent study, 40 percent of millennials, and many youngsters in major European countries know little or nothing about Auschwitz. Another is that not everyone has had the chance to actually visit the former camp in the Polish town of Oswiecim, so this is an opportunity to experience up close what millions have traveled thousands of miles to see since the camp was dedicated as a memorial in 1947.

Posted by: Ernest Barteldes | June 12, 2019

More Tapas!


42851130_10155847696413733_8149420395112431616_n

Tapas from Cafeteria La Flor, Malaga (Ernest Barteldes)

By Ernest Barteldes


Last week I posted a piece about tapas that was very well received in comparison to earlier efforts (well, let’s face it – the page hadn’t really been active since I wrote about this new kind of sandwich  a few weeks back due to personal issues that kept me away from writing (those who know me know what I am talking about) but going forward I hope I will be able to drop a weekly piece both here and on Music Whatever, my sister culture blog.

Like I said before, tapas can be anything you want – they are not appetizers for two reasons: they do not come before any meal, and considering that in some places appetizers “to share” can be as big as a meal (looking at you, Applebee’s), I wouldn’t say they’d qualify. A couple of sliders? Absolutely.  A few mini-pizzas (also known as pizette)?  No problem at all.

At home we always do a light lunch on Saturdays – sometimes a sandwich or something like that, but lately I’ve been substituting them with tapas if time allows it. One favorite is a simple dish made with boiled potatoes, chorizo and pancetta (Italy’s version of bacon, which is lighter in taste and not as fatty), which I paired with shrimp pancakes made with a mix of chickpea and wheat flour.

Potatoes with chorizo

recipe-image-legacy-id-1259603_7

Source: Comer Y Disfrutar: Tapas

(My translation)

(Serves 4)

3 lbs. small new potatoes

Sea salt to taste

4 oz. (100 grams) chorizo, sliced

5 oz.  (125 grams) pancetta

Olive oil for frying

3 garlic cloves, chopped

½ bunch fresh parsley, chopped


  1. Boil the potatoes with salt between 15 to 20 minutes until tender. Drain and return to pot and reserve
  2. Sauté the chorizo and pancetta with a little olive oil for about a minute and add the chopped parsley, and then add to the reserved potatoes
  3. Add a little more salt and return the mix to heat, mixing well until all ingredients are well mixed. Serve immediately


Shrimp pancakes

img_1785

Ingredients

8 tablespoons chickpea flour

8 tablespoons white flour

3 onions, chopped

250 g (1 lb.) shrimp, peeled and deveined

2 tablespoons parsley, chopped

1 teaspoon sea salt

Olive oil for frying


  1. In a large bowl, mix the two flour types with ½ pint (250 ml) cold water until you get a homogenous paste. If too thick, add a little more water.
  2. Chop the shrimp and add to the flour mix with the onions and parsley. Season the mix and let rest for 3 hours. If necessary, add a little more water.
  3. Heat the olive oil and add one tablespoon of the mix.
  4. Flatten the pancakes with the back of the spoon making it as flat as possible. Fry on both sides until golden, and transfer to plate with paper towels. Serve warm, cut in slices
Posted by: Ernest Barteldes | June 6, 2019

The Wonderful World of Tapas


By Ernest Barteldes

42724808_10155841335778733_5981187300543954944_n

Tapas at LaFlor in Malaga (Ernest Barteldes)

The idea of small plates – except in one bizarre case in Philadelphia several years ago – is quite appealing to me, and that grew after Renata and I visited several tapas restaurants here in New York and even more following our vacation in Malaga, Spain.

Tapas (which literally translates as “cover” or “lid”) are basically any kind of food served in small plates, not only food from Spain – so anything can be called “tapas,” even pizza – as long as it’s served in small portions. You can have them to accompany a drink or just make a meal out of them by ordering several servings. At home, I often prepare several small dishes for lunch on weekends instead of making one big filling meal, combining them wherever inspiration carries me.

42538753_10155834742638733_7085644896693911552_n

More Tapas from Cafeteria La Flor (Ernest Barteldes)

During our stay in Spain, we sometimes opted to have a tapas dinner instead of ordering a full three-course meal because it gave us the opportunity to sample several different dishes at one time. Sure, there were times we went for paella or other traditional meal, but what we mostly did was tapas at Cafeteria La Flor, a family coffee shop down the street from our hotel and also at a tapas bar in downtown Malaga called Jamones – a wordplay between the word “jamon”(ham)  and the Queens punk band “Ramones,” whose logo they borrow from for their restaurant. We also went on a guided tapas tour, when we visited several small restaurants around town and sampled countless tastes accompanied by plenty of wine – quite an experience that I really recommend if any of my readers visit the city, which is also the birthplace of Pablo Picasso and actor Antonio Banderas.

During our visit we stopped at this outdoor market where we found books, videos and many other things – clearly not a tourist trap but a place where locals go, since there was almost nothing printed in another language but Spanish. I picked up two inexpensive cookbooks, one titled “Tapas” and another “Mediterranean Cuisine” (“Cocina mediterránea”), which I have been experimenting with from time to time during our Saturday afternoon lunches, when I try to cook something tasty but at the same time light and satisfying.

Among the dishes I’ve tried are mushrooms cooked in a sherry-based sauce, which I like to pair with sautéed chicken bites with a tangy brown mustard sauce – they are great especially during the hotter days of summer along a nice rosé wine. They also make for great appetizers or simply what they are intended to be – food to go together with drinks.


champinones-a-la-mediterranea-foto-principal

Mushrooms in Sherry Sauce

(Serves 4)

1 ½ lb. fresh baby Bella mushrooms, washed and sliced

2 medium onions, sliced

Olive oil for frying

Salt and black pepper to taste

1 ½ oz. pine nuts

1 oz. dry sherry

Finely chopped parsley to taste

Preparation:


  1. Heat the olive oil in a frying pan and add the onions, stir-frying until golden. Add the mushrooms and continue frying for 8-10 minutes.
  2. In a separate pan, toast the pine nuts until slightly browned, and add to the mushroom mix. Add the sherry and mix well, adding the chopped parsley at the end. Serve warm.

receta-de-fingers-de-pollo-con-salsa-de-mostazay-miel

Chicken Breast in Honey Mustard Sauce

(Serves 4)

Ingredients:

4 boneless chicken breast halves, cut in bite-size pieces

Salt and black pepper to taste

2 eggs, beaten

2-4 tablespoons flour

1 0z. honey

1 tablespoon brown (Dijon) mustard

2 teaspoons sherry vinegar


  1. Place the pieces of chicken in a bowl and add salt and pepper to taste, covering them well. Add the beaten eggs and add the flour, covering the pieces well on all sides
  2. Heat a pan with olive oil and fry the pieces for about 15 minutes, making sure they’re done on all sides and remove from heat
  3. Mix the vinegar, honey and mustard until well blended, and serve as a dip with the chicken


Source: Comer & Disfrutar: Tapas, translated from Spanish by Ernest Barteldes

Older Posts »

Categories